Road Trip

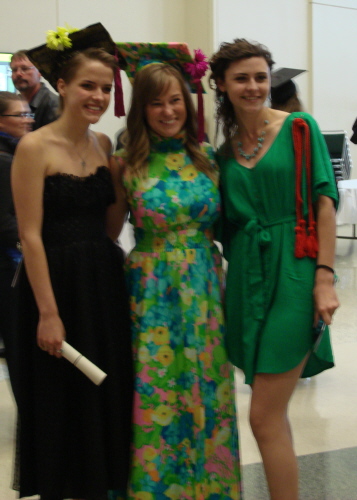
Mother’s Day weekend we made a road trip to Indiana.  We were celebrating my youngest sister’s birthday and her youngest daughter’s graduation from college,   Frankie fed us simple meals that were very tasty and filling.  Usually she uses our visit to try new recipes, but this time we all spent less time in the kitchen, so we had more time to visit.

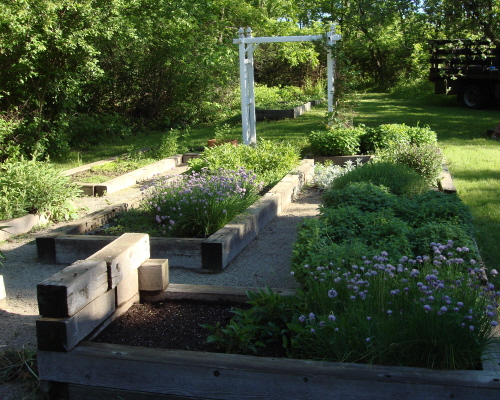
We spent Saturday afternoon and evening and Sunday morning, visiting.  Sunday afternoon we went to Indy for the commencement, followed by a wonderful meal at our favorite bistro.  Monday, we sat in the shade while Frankie worked on her herb garden.  I wish I could work as fast as she does!  I should have taken before and after pictures

My beautiful niece is the one on the right in the green dress, with the very long legs! She graduated with honors, and we are tremendously proud of her.

Becca and two Friends Resized

The Herb Garden

I spent four hours in the herb garden last week.  I find that two hours a day on my hands and knees is the limit.  I really hadn’t planned to do so much in the herb garden, but it moved along so well I just kept at it.  I still need to clear out the lower left  branch of the walkway, and transplant the thyme from the right to left upper arm of the garden.  I’m late getting the annuals in.  I have some basil and a couple of miniature tomatoes to plant.  I need to pick up more basil, parsley, rosemary, a pickle cucumber plant and a zucchini. And, I need to decide what I can plant in the upper left bed that will grow in a half day of shade.  I planted nasturtiums on either side of the walkway opening at the bottom of the garden.  I can see a couple of the seedlings from the kitchen windows.  If only half of them grow, I’ll have masses of color this summer!

Herb Garden Early Morn Resized

At the top right corner I have a good stand of lemon balm.  I think I’ll plant lemon verbena and a lemon scented geranium right in front of it, for a lemon garden.  I love saving the lemon verbena for use in potpourri. It’s too cold here to winter it over.

Fresh oregano, anyone?  I have loads of it to give away!


The Front Gardens

I wish I could tell you that I have been slaving away in the gardens for the past week, but the weather has been so odd, that I’ve spent most of the time inside.  In that time the gardens have gone from getting ready to bloom to lush.  The early iris are open, and the volunteer Ox-eye daisies are in bloom.  Here are some pictures of the gardens at the front of the house.

Last fall I planted these tulips and crocus at the front of the garage.

Pink Tulips Resized

The Sweet William is flourishing at the corner of the sidewalk.

Sweet William Resized

I don’t know how to describe the color of this iris, but it’s one of my favorites and is not spreading as the others do.

South Iris Resized

You’ll have to look closely to see the blue blooms, but I have what some people call “Perennial Bachelor’s Buttons (Centaurea montana)”  in a group of perennials at the front of the house.

Perennial Bachelor's Button Resized

The early iris close to the garage are blooming.  The over 80 degree heat today really brought them out.  It might be a short season, so I’ve been taking pictures.  The lighter ones to the far left are “Katie’s Blush.”  I bought them in honor of the birth of one of my nieces.

Garage Iris Resized

And this is what the sidewalk gardens looked like a few days ago before they erupted in greens and daisies and flowers:

Sidewalk Early Iris Resized

Thanks to the storms and heat I have lots of work to do.  When the iris have completed their bloom season I plan to move several of them to better locations.  I’ll be able to get rid of some grass that has made a stand in the gardens.  I’m pleased to say that on the right side of this garden there are several Oriental Poppies that have self propagated.  The original plant is still doing well, and it’s given me more volunteers.  Pictures later, when they bloom.

Safety Pins

I have been quilting a twin-sized quilt at my sewing machine.  It’s a pretty easy process, thanks to having  flattened the quilt sandwich beforehand.  I laid out the backing, face down, on the table in my studio and made sure there were no wrinkles or bubbles in the fabric.  Then, I laid the batting over the backing and repeated the process.  Finally, I set the top, face up, over the other layers and secured all three to my table.  Then I used  safety pins to pin through all three layers.  I’m using cotton batting, so I need to pin fairly close together.

I have three types of pins: one-inch straight sided safety pins, one and three-eights inch straight-sided safety pins, and bent one-inch safety pins.  I know, that was tough to read.  Just look at the picture, and you’ll, well, get the picture:

Safety Pins Resized

I have no idea how many pins I used on the 60 x 75 inch quilt, but I can tell you that  the one-inch straight-sided pins are killers.  They are so hard to close that they drilled a dent into my index finger nail.  If I keep these pins, and that’s a BIG IF, I’ll have to get one of those spoons you can use to help close the pin.  My fingers hurt all weekend.

I shifted the longer pins, which I thought I would like the most.  They are much easier to use, but it seems that the point can dull, and I don’t like to leave huge holes in my quilts.

The last pins I used turned out the be the best.  The bent one-inch pins are easiest to open and close, and leave a smaller hole than the bigger pins.  I need to put these on my wish list.  If I’m going to continue to do quilts larger than 45″ x 60″ I’ll need more.  Anything, to save my fingers!